.png)
How to boost the Milky Way Colour
- grey1217

- Jul 31, 2022
- 3 min read

Are you having difficulty enhancing the colour of the Milky Way? Editing the colour of the Milky Way can be tricky, especially if you are shooting at a location with a certain amount of Light Pollution.
I'm going to share two methods to enhance the orangish colour of the Milky Way core.
Before that, I will first apply some contrast and colour adjustments to the photo. Here's the original raw photo. You may want to apply a more aggressive contrast adjustment to the sky separately to bring out the details of the Milky Way.

And here's the edited version, which I'm going to boost the Milky Way colour further from here.

The first method I'm going to share here is simply using the Brush tool to paint out the colour.
You can create a Colour Balance Adjustment Layer by clicking on the circle icon and adding more Yellow and Red to the photo.

However, the adjustment applies to the entire photo and causes the photo to look more yellowish/purplish. We want to restrict the effect to only the core of the Milky Way.

To do that, let's click on the Layer Mask and press Ctrl + I (Win) / Cmd + I (Mac) to invert the Layer Mask to black, temporarily hiding the adjustment effect.

From there, you choose the Brush tool, set the Foreground Colour is White, Opacity at 25%, and paint on the core of the Milky Way. You may also want to paint repeatedly on a certain area to apply a stronger adjustment or decrease the opacity to have a smoother blending result.
For example.

Here’s the result after the masking. You can see the adjustment is currently restricted only to the Milky Way core.

This is a very common method to enhance the Milky Way colour, but it also requires some practice to achieve a smooth and natural result. Many beginners make a mistake in using the brush tool with a very high opacity which can see the "painting mark" on the Milky Way.

Because of that, I prefer to use another method. It involves using the RGB channel to create a selection that restricts the colour to only the core of the Milky Way. It is slightly more advanced, but it is not really that hard to use.

Go to the Channel window, and go through the Red, Green and Blue channels to pick one that has the best selection in selecting only the Milky Way. Usually, the Red channel would be the one.

Ctrl + Click on the Red Channel to create a Selection. You will see the marching ants on the photo like the below example.

From here, you can add a Colour Balance adjustment layer to add more Orange, Magenta or Red to the photo. You can also apply a stronger adjustment as it has a better selection compared to the previous method.

If you want to restrict the adjustment further, you can create a Group folder and add a Layer Mask to the group layer. Then use the brush tool with white foreground colour to paint on the Layer Mask to apply the adjustment only to the Milky Way core.
You can select the Colour Balance adjustment layer and press Ctrl + G / Cmd + G to create the Group layer and put the adjustment layer under the group layer. Alternatively, you can also click on the folder icon to create the Group layer.

Here’s the final result. 🙂
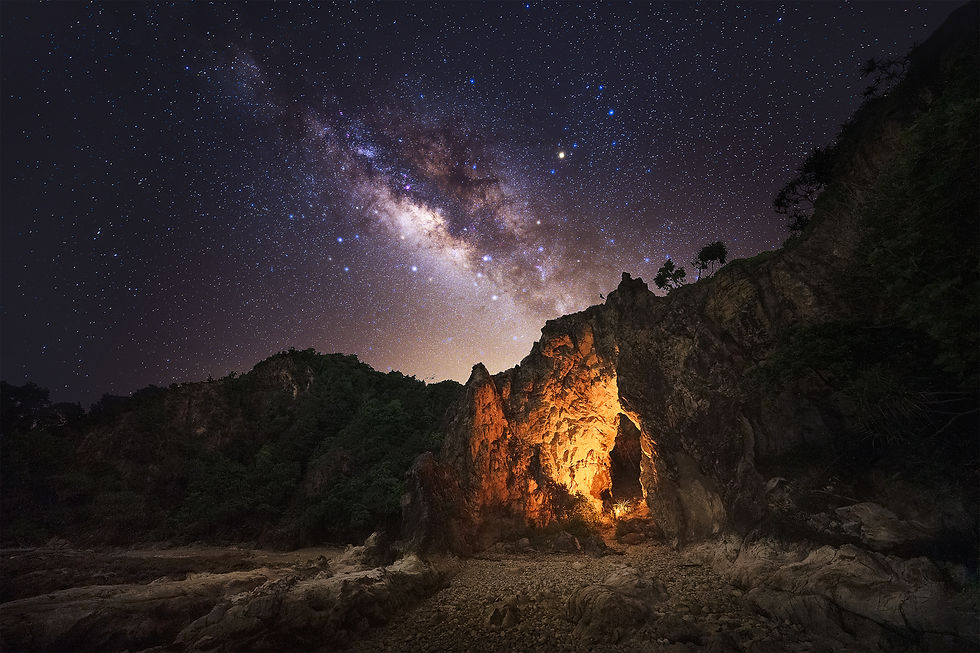
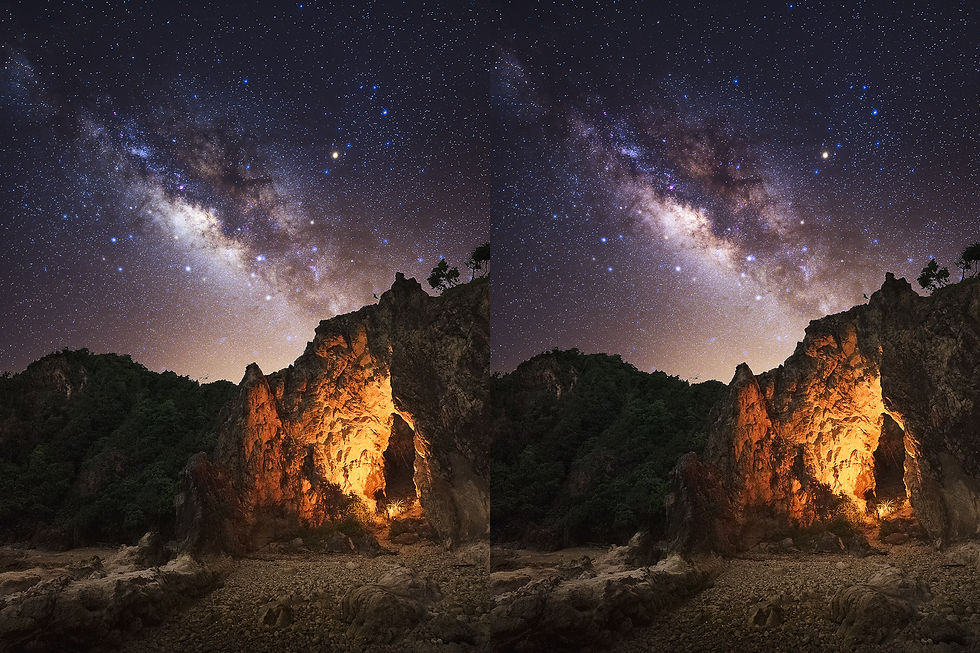
Also, here's the before and after comparison.
That's all for this article. If you are interested to learn more from me, you can check out my upcoming ASTROPHOTOGRAPHY WORKSHOP. 😉

Happy shooting!
Please feel free to share this post if you enjoy reading it! :)
Want to learn more with only 1-time payment? Check out our Masterclass program

Join our Photography Masterclass Community & improve your photography skill.
Subscribe to receive photography tips & tricks and update from Grey Chow


Le pyjama devient une pièce à part entière du vestiaire masculin. Bien au-delà de sa fonction première, il représente aujourd’hui un symbole de bien-être et d’attention portée à soi. En parcourant les modèles tendance de pyjama homme, on découvre cette évolution vers des vêtements d’intérieur élégants, adaptés à toutes les morphologies. Les marques misent sur des matières naturelles et des coupes ajustées pour garantir un maintien idéal tout en conservant la liberté de mouvement. C’est la preuve que le style ne s’arrête pas à la porte de la chambre, mais continue jusque dans les moments de détente.